
WordPress SEO Audit Checklist (2025)
A Step-by-Step Guide to Unlocking Explosive Growth, Dominating Google, and Leaving Your Competitors in the Dust
It’s a feeling every website owner dreads. You pour your heart, soul, and budget into creating a beautiful WordPress site, only to be met with deafening silence from Google. No traffic, no rankings, no leads. It’s like throwing a party and having no one show up.
One of our clients, a Phoenix-based law firm, was in this exact position. Their website was a ghost town. After a comprehensive WordPress SEO audit, we identified and fixed a series of critical but hidden issues. The result? An 850% increase in organic traffic in 12 months, a flood of new high-value cases, and the addition of two new attorneys to handle the growth.
This isn’t a rare success story; it’s the predictable outcome of a properly executed SEO audit. And it’s why we’ve created this guide.
This is not another basic checklist. This is THE ULTIMATE GUIDE to conducting a WordPress SEO audit in 2025. We are going beyond the generic advice and giving you the exact, step-by-step process we use to deliver transformative results for our clients. We will cover everything from foundational checks to advanced troubleshooting, complete with real Phoenix case studies, downloadable resources, and interactive tools that you won’t find anywhere else.
By the end of this guide, you will have a complete roadmap to diagnose every issue holding your site back, create a prioritized action plan, and unlock the explosive growth that comes from a perfectly optimized WordPress website.
—
Part 1: What is a WordPress SEO Audit? (And Why It’s Non-Negotiable in 2025)
A WordPress SEO audit is a comprehensive health checkup for your website. It’s a systematic process of analyzing your site’s technical infrastructure, on-page elements, and off-page authority to identify issues that are hindering its performance in search engines like Google. Think of it as a doctor’s diagnostic exam for your website’s ranking potential.
In 2025, with Google’s algorithms more sophisticated than ever and AI-driven search becoming the norm, a regular SEO audit is no longer optional—it’s essential for survival and growth. Google rewards websites that provide a flawless user experience, demonstrate deep expertise, and are technically sound. An audit is the only way to ensure you’re meeting these high standards.
Types of SEO Audits
A complete audit covers three main areas:
1. Technical SEO Audit: This examines the backend of your site to ensure it can be crawled and indexed efficiently. It covers site speed, mobile-friendliness, site architecture, and security.
2. On-Page SEO Audit: This focuses on the content and HTML source code of your pages. It includes analyzing keywords, meta tags, headings, content quality, and internal linking.
3. Off-Page SEO Audit: This assesses your site’s authority and reputation on the web. It involves analyzing your backlink profile, brand mentions, and local SEO signals.
When Should You Perform an SEO Audit?
- At the start of any SEO campaign: To establish a baseline and create a strategy.
- Quarterly: To stay ahead of algorithm changes and competitor movements.
- After a major site redesign: To ensure no new issues were introduced.
- When you notice a sudden traffic drop: To diagnose and fix the problem quickly.
DIY vs. Professional Audit
- DIY Audit: Using this guide, you can perform a very thorough audit yourself. This is a great option for small business owners, marketers, and anyone who wants to learn the ins and outs of SEO.
- Professional Audit: For complex websites, competitive industries, or businesses that lack the time and resources, a professional audit from an agency like Phoenix SEO Geek can provide deeper insights and a faster path to results.
—
Part 2: The Auditor’s Toolkit: 7 Essential Tools for Your WordPress SEO Audit
To conduct a thorough audit, you need the right tools. While there are hundreds of options available, you can accomplish 95% of your audit with this handful of essential, mostly free tools. We’ve broken them down by their primary use to help you build your toolkit.

| Tool Name | Type | Primary Use | Difficulty |
| :— | :— | :— | :— |
| Google Search Console | Free | Indexing, Crawl Errors, Performance | Beginner |
| Google PageSpeed Insights | Free | Site Speed & Core Web Vitals | Beginner |
| Google Analytics 4 | Free | Traffic Analysis, User Behavior | Beginner |
| Screaming Frog SEO Spider | Free/Paid | Technical Crawl, Site Architecture | Intermediate |
| Ahrefs/SEMrush | Paid | Backlinks, Keywords, Competitors | Advanced |
| Yoast SEO / Rank Math | Free/Paid | On-Page SEO, Sitemaps | Beginner |
| Schema Markup Validator | Free | Structured Data Testing | Intermediate |
How to Set Up Your Tools
1. Google Search Console (GSC): This is non-negotiable. If you haven’t already, go to the [Google Search Console website](https://search.google.com/search-console/about) and add your website. Verification is simple, especially if you already have Google Analytics installed.
2. Google Analytics 4 (GA4): This is your hub for understanding user behavior. Create a property for your site on the [Google Analytics website](https://analytics.google.com/analytics/web/).
3. Screaming Frog: Download the free version from the [Screaming Frog website](https://www.screamingfrog.co.uk/seo-spider/). The free version allows you to crawl up to 500 URLs, which is enough for most small to medium-sized websites.
4. Ahrefs/SEMrush: These are premium tools, but both offer free trials or limited free versions that can provide valuable data for your audit.
5. Yoast SEO / Rank Math: You should already have one of these installed on your WordPress site. If not, install one now. They are essential for on-page optimization.
With your toolkit assembled, you’re ready to begin the most comprehensive WordPress SEO audit you’ve ever performed.
—
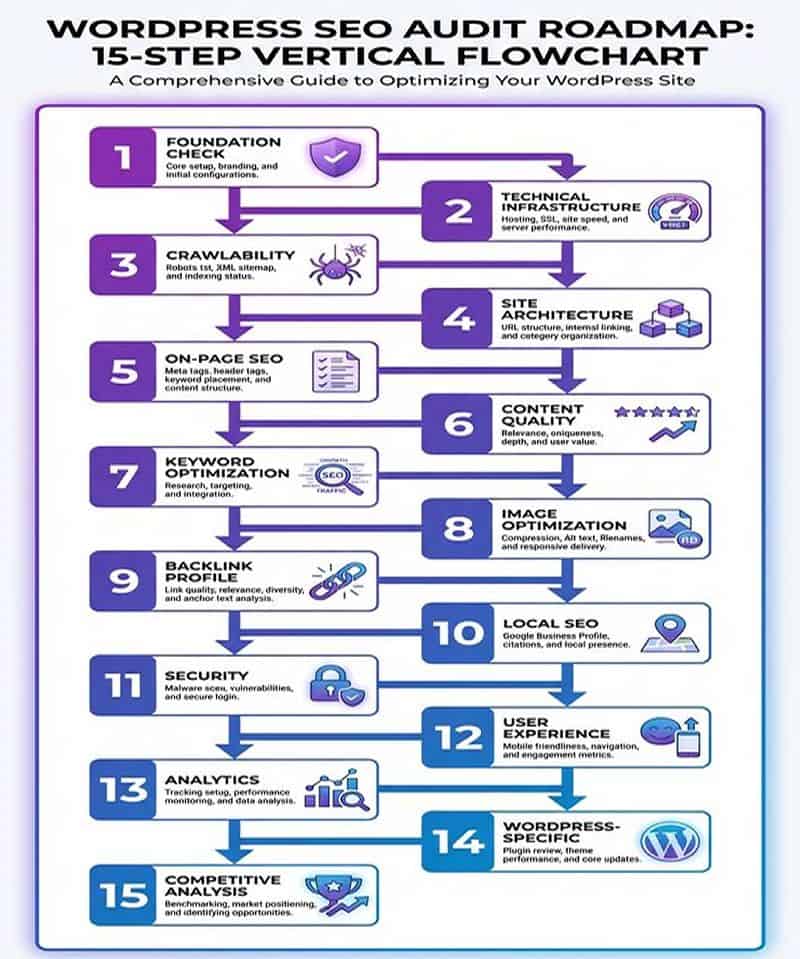
Part 3: The 15-Step Ultimate WordPress SEO Audit Checklist
This is the core of our guide. Follow these 15 steps meticulously, and you will uncover every opportunity to improve your site’s performance. For each step, we’ll explain the Objective, the Tools you’ll need, and the Process to follow.
Step 1: Foundation Check (The Non-Negotiables)
Objective: Ensure your site is visible to search engines and has a secure, single, canonical version.
Tools: Google Search, Your Brain, Google Search Console
Process:
1. Check Search Engine Visibility: In your WordPress dashboard, go to `Settings > Reading`. Ensure the box for “Discourage search engines from indexing this site” is UNCHECKED. This is the #1 cause of indexing issues. We’ve seen this single checkbox cost businesses tens of thousands of dollars in lost revenue because their site was completely invisible to Google for months.
2. Verify HTTPS: Your site must use HTTPS. Check for the padlock icon in your browser’s address bar. If you don’t have it, get an SSL certificate immediately. Most hosts like Bluehost, SiteGround, and WP Engine offer them for free through Let’s Encrypt. HTTPS is not just a ranking factor—it’s a trust signal. Users are far less likely to enter personal information or make a purchase on a non-secure site.
3. Check for a Single Canonical Version: Your site should only be accessible at one URL. Type these four versions of your domain into your browser:
– `http://yourdomain.com`
– `http://www.yourdomain.com`
– `https://yourdomain.com`
– `https://www.yourdomain.com`
All four should redirect to the same final URL (preferably the `https://www` or `https://non-www` version). If they don’t, you have a major duplicate content issue that needs to be fixed with 301 redirects. You can set this up in your `.htaccess` file or through your hosting control panel. This is critical because Google may see your site as having duplicate versions, diluting your ranking power.
4. Verify Indexation Status: Go to Google and type `site:yourdomain.com`. This shows you how many pages Google has indexed. Compare this to the actual number of pages on your site. A big discrepancy means you have indexing issues that need to be addressed.
Step 2: Technical Infrastructure (Speed & Mobile)
Objective: Ensure your site provides a lightning-fast, seamless experience on all devices.
Tools: Google PageSpeed Insights, Google’s Mobile-Friendly Test, GTmetrix
Process:
1. Analyze Core Web Vitals: Go to [Google PageSpeed Insights](https://pagespeed.web.dev/) and enter your homepage URL. Your goal is to have a “Good” score (green) for all three Core Web Vitals:
– Largest Contentful Paint (LCP): Should be under 2.5 seconds. This measures how long it takes for the largest content element to load. Common causes of poor LCP include slow server response times, render-blocking JavaScript and CSS, and large, unoptimized images.
– Interaction to Next Paint (INP): Should be under 200 milliseconds. This measures how quickly your site responds to user interactions. Poor INP is often caused by long-running JavaScript tasks and heavy third-party scripts.
– Cumulative Layout Shift (CLS): Should be under 0.1. This measures visual stability. Elements shifting around as the page loads create a poor user experience. Common causes include images without dimensions, ads or embeds injected dynamically, and web fonts causing FOIT/FOUT.

2. Test Mobile-Friendliness: Use [Google’s Mobile-Friendly Test](https://search.google.com/test/mobile-friendly) to ensure your site is easy to use on a mobile device. With mobile-first indexing, Google predominantly uses the mobile version of your site for ranking. A site that isn’t mobile-friendly is essentially invisible in 2025.
3. Check Page Speed: Aim for a load time under 2 seconds. PageSpeed Insights will give you a list of opportunities to improve your speed. The most common fixes include:
– Optimize Images: Use WebP format, compress to 70-80% quality, and implement lazy loading.
– Leverage Browser Caching: Set expiry dates on static resources so returning visitors load your site faster.
– Minify CSS/JavaScript: Remove unnecessary characters from code to reduce file size.
– Use a CDN: A Content Delivery Network serves your site from servers closest to your users, dramatically reducing load times for global audiences.
– Upgrade Hosting: If you’re on cheap shared hosting, upgrading to managed WordPress hosting (like WP Engine or Kinsta) can provide a massive speed boost.

Step 3: Crawlability & Indexation
Objective: Ensure Google can efficiently find, crawl, and index all the important pages on your site.
Tools: Google Search Console, Screaming Frog, Yoast SEO / Rank Math
Process:
1. Review Index Coverage Report: In Google Search Console, go to the `Indexing > Pages` report. This is your window into how Google sees your site. Look for:
– Errors: Pages that couldn’t be indexed due to technical issues (e.g., server errors, redirect errors).
– Warnings: Pages with potential issues (e.g., indexed despite noindex tag).
– Excluded: Pages intentionally not indexed (e.g., duplicate content, blocked by robots.txt).
– Valid: Pages successfully indexed.
Pay close attention to pages that are “Discovered – currently not indexed” or “Crawled – currently not indexed.” This indicates Google found the page but doesn’t see it as valuable enough to index. Common causes include thin content, duplicate content, or low-quality backlinks.
2. Check Your XML Sitemap: Ensure you have an XML sitemap. Yoast and Rank Math create this automatically at `yourdomain.com/sitemap_index.xml`. Your sitemap is like a roadmap for Google, telling it which pages are most important and how often they’re updated. Submit this sitemap to Google Search Console under `Sitemaps`. Also check that your sitemap only includes indexable pages (no 404s, no redirects, no noindexed pages).
3. Review Your Robots.txt File: Your `robots.txt` file (`yourdomain.com/robots.txt`) tells search engines which pages to avoid. A common mistake is blocking important directories like `/wp-content/uploads/` (where your images live) or accidentally blocking the entire site with `Disallow: /`. Make sure your robots.txt is helping, not hurting, your SEO.
4. Check for Crawl Budget Issues: For large sites (10,000+ pages), crawl budget can be an issue. Google has a limited amount of time it will spend crawling your site. Use the Crawl Stats report in Search Console to see how many pages Google is crawling per day. If it’s low and you have many unindexed pages, you may need to improve your site’s crawlability by fixing broken links, improving site speed, and reducing duplicate content.
Step 4: Site Architecture & Internal Linking
Objective: Create a logical site structure that is easy for both users and search engines to navigate.
Tools: Screaming Frog, Your Brain
Process:
1. Crawl Your Site: Run a crawl of your site with Screaming Frog. This will give you a complete list of all your URLs.
2. Analyze Site Structure: Is your site structure logical and hierarchical? A good structure is typically `Homepage > Categories > Sub-categories > Individual Pages/Posts`. Keep your structure as flat as possible, aiming for all important pages to be within 3 clicks of the homepage.
3. Audit Internal Linking: Use Screaming Frog to check for orphan pages (pages with no internal links pointing to them). Every important page should have several internal links from other relevant pages on your site. A good rule of thumb is to have at least 3-5 internal links to and from every important page.

Step 5: On-Page SEO Elements
Objective: Optimize every page for its target keyword and ensure it communicates its topic clearly to search engines.
Tools: Screaming Frog, Yoast SEO / Rank Math
Process:
1. Crawl for On-Page Data: Use Screaming Frog to pull all of your page titles, meta descriptions, H1s, and H2s.
2. Analyze Page Titles: Are they unique, under 60 characters, and do they contain your target keyword?
3. Analyze Meta Descriptions: Are they unique, under 155 characters, and written like a compelling ad to encourage clicks?
4. Check Heading Hierarchy: Every page should have one, and only one, H1 tag that includes the main keyword. Use H2s for subheadings and H3s for further sub-points in a logical order.
5. Review URL Structure: Are your URLs short, descriptive, and do they include your keyword? Use hyphens to separate words (e.g., `/wordpress-seo-audit/`).

Step 6: Content Quality Audit (E-E-A-T)
Objective: Ensure your content is comprehensive, helpful, and demonstrates Experience, Expertise, Authoritativeness, and Trustworthiness (E-E-A-T).
Tools: Google Analytics, Your Brain
Process:
1. Identify Low-Quality Pages: In Google Analytics, look for pages with high bounce rates, low time on page, and few conversions. These are often candidates for improvement or removal.
2. Check for Thin Content: Do you have pages with very little content (under 300 words) that don’t provide much value? These should be expanded or consolidated.
3. Evaluate for E-E-A-T: For your most important pages, ask yourself:
– Experience: Does the content show you have real, first-hand experience with the topic?
– Expertise: Is the content written by a subject matter expert?
– Authoritativeness: Is your site a known authority on this topic?
– Trustworthiness: Is your site secure, with clear contact information and positive reviews?
4. Look for Duplicate Content: Use a tool like Siteliner or Screaming Frog to find instances of duplicate content on your site. Consolidate or de-index these pages.
Step 7: Keyword Optimization
Objective: Ensure you are targeting the right keywords and avoiding common pitfalls like keyword cannibalization.
Tools: Ahrefs/SEMrush, Google Search Console
Process:
1. Map Keywords to Pages: Create a spreadsheet mapping each important page on your site to a primary target keyword and 2-3 secondary keywords.
2. Check for Keyword Cannibalization: This happens when multiple pages on your site compete for the same keyword. Use Ahrefs or SEMrush to see if you have multiple URLs ranking for the same term. If so, you may need to merge the pages or de-optimize one of them.
3. Find New Keyword Opportunities: Use the Performance report in Google Search Console to find keywords where you are ranking on page 2 or 3. These are great candidates for a content refresh to push them to page 1.
Step 8: Image Optimization
Objective: Ensure your images are helping, not hurting, your SEO by being properly sized, compressed, and tagged.
Tools: Screaming Frog, Image editing software (e.g., Photoshop, TinyPNG)
Process:
1. Crawl for Missing Alt Text: Use Screaming Frog to find all images that are missing alt text. Alt text is crucial for accessibility and helps search engines understand what your images are about.
2. Check Image File Sizes: Large images are a primary cause of slow page speed. Aim for all images to be under 100 KB. Use a tool like TinyPNG to compress your images.
3. Ensure Lazy Loading: Lazy loading defers the loading of off-screen images until the user scrolls to them. This can dramatically improve initial page load time. Most modern WordPress caching plugins have this feature.
Step 9: Backlink Profile Analysis
Objective: Assess the quality and quantity of websites linking to you and identify any toxic links that could be hurting your rankings.
Tools: Ahrefs/SEMrush, Google Search Console
Process:
1. Analyze Your Backlink Profile: Use Ahrefs or SEMrush to get a complete list of your backlinks. Look at the Domain Rating (DR) or Authority Score (AS) of the linking sites. You want to see links from high-authority, relevant websites.
2. Identify Toxic Links: Look for links from spammy, low-quality, or irrelevant websites (e.g., foreign-language sites, gambling sites, PBNs). These can harm your SEO.
3. Disavow Toxic Links: If you have a significant number of toxic links, you may need to create a disavow file and submit it to Google Search Console. This tells Google to ignore those links when assessing your site. Use this feature with caution.

Step 10: Local SEO Signals (For Local Businesses)
Objective: Optimize your site for local search to attract customers in your geographic area.
Tools: Google Business Profile, BrightLocal/Whitespark
Process:
1. Audit Your Google Business Profile (GBP): Is your GBP fully filled out with accurate information, including your business name, address, phone number (NAP), hours, services, and photos? Are you regularly posting updates and responding to reviews?
2. Check NAP Consistency: Your Name, Address, and Phone number must be consistent across your website and all major online directories (Yelp, Yellow Pages, etc.). Use a tool like BrightLocal to check for inconsistencies.
3. Analyze Local Rankings: Use a rank tracker to see how you rank for your target keywords plus your city (e.g., “wordpress seo consultant phoenix”).
Step 11: Schema Markup
Objective: Use structured data to help Google understand your content better and earn rich snippets in search results.
Tools: Schema Markup Validator, Yoast SEO / Rank Math
Process:
1. Identify Schema Opportunities: What kind of content do you have? You can use different types of schema for articles, FAQs, how-to guides, products, reviews, and local businesses.
2. Implement Schema: Use your SEO plugin (Yoast/Rank Math) to add the appropriate schema to your pages. For example, use FAQ schema on pages with a question-and-answer format to get rich snippets in the SERPs.
3. Validate Your Schema: After implementing, use the [Schema Markup Validator](https://validator.schema.org/) to test your pages and ensure there are no errors.

Step 12: Security Audit
Objective: Ensure your site is secure from malware, hacking attempts, and other vulnerabilities that can get your site de-indexed.
Tools: Sucuri SiteCheck, Wordfence Plugin
Process:
1. Scan for Malware: Use a free tool like [Sucuri SiteCheck](https://sitecheck.sucuri.net/) to scan your site for known malware or blacklisting issues.
2. Check for Security Best Practices:
– Are you using a security plugin like Wordfence?
– Are you using strong, unique passwords for all users?
– Is your WordPress version, as well as all plugins and themes, up to date?
3. Review User Permissions: In your WordPress dashboard under `Users`, make sure no one has a higher permission level than they need (e.g., don’t give writers Administrator access).
Step 13: User Experience (UX) & Engagement
Objective: Ensure your website is intuitive, engaging, and provides a positive experience that encourages users to stay and convert.
Tools: Hotjar/Microsoft Clarity, Google Analytics 4
Process:
1. Analyze User Behavior: In GA4, review metrics like `Engaged sessions`, `Average engagement time`, and `Conversions`. Pages with low engagement are red flags.
2. Review Heatmaps & Session Recordings: Use a tool like Hotjar or Microsoft Clarity (which is free) to watch how real users interact with your site. Where do they click? Where do they get stuck? Heatmaps and recordings provide invaluable insights into UX issues.
3. Check for Clear Calls-to-Action (CTAs): Is it obvious what you want users to do on each page? Your CTAs (e.g., “Get a Free Quote,” “Contact Us Today”) should be prominent and compelling.
Step 14: WordPress-Specific Issues
Objective: Address common issues specific to the WordPress platform that can bloat your site and slow it down.
Tools: WordPress Dashboard
Process:
1. Audit Your Plugins: Deactivate and delete any plugins you are not using. Too many plugins, especially low-quality ones, can create security risks and slow your site down.
2. Check Your Theme: Is your theme lightweight and well-coded? Some themes are notoriously bloated. If your theme is a major source of speed issues, consider switching to a lightweight theme like GeneratePress or Kadence.
3. Clean Your Database: Over time, your WordPress database can get filled with junk like post revisions, transients, and spam comments. Use a plugin like WP-Optimize to clean your database.
4. Manage Comment Spam: If you have comments enabled, make sure you are using a tool like Akismet to prevent spam, which can bloat your database and hurt your site’s reputation.
Step 15: Competitive Analysis
Objective: Benchmark your site against your top competitors to find gaps in your strategy and opportunities to outperform them.
Tools: Ahrefs/SEMrush
Process:
1. Identify Your True Competitors: Who is ranking in the top 3-5 spots for your main target keywords? These are your direct SEO competitors.
2. Analyze Competitor Content: Look at their top-ranking pages. How long is their content? What topics do they cover? What is their E-E-A-T like? Identify gaps where you can create something more comprehensive and valuable.
3. Analyze Competitor Backlinks: Use Ahrefs or SEMrush to see who is linking to your competitors. This can be a goldmine for finding new backlink opportunities for your own site.
—
Part 4: From Audit to Action: Creating Your Prioritized Roadmap
An audit is useless without action. Now that you have a list of issues, you need to prioritize them. The best way to do this is with a Priority Matrix, which plots tasks based on their potential impact and the effort required to implement them.

1. Quick Wins (High Impact, Low Effort): Do these immediately. These are the low-hanging fruit that can provide a quick boost.
– *Examples: Fixing broken links, adding missing alt text, enabling browser caching.*
2. Major Projects (High Impact, High Effort): These are the game-changers that will require significant time and resources. Plan these out and tackle them one by one.
– *Examples: A complete site redesign, a major content overhaul, a strategic backlink campaign.*
3. Fill-Ins (Low Impact, Low Effort): Fit these in when you have time. They won’t make or break your SEO, but they contribute to overall site health.
– *Examples: Updating old meta descriptions, adding a few more internal links.*
4. Time Wasters (Low Impact, High Effort): Avoid these. The ROI is simply not there.
– *Examples: Obsessing over minor design tweaks, trying to over-optimize a page that already ranks well.*
Create a spreadsheet and list every issue you found during your audit. Assign an “Impact” score (1-5) and an “Effort” score (1-5) to each. This will help you categorize them and build a realistic action plan.

—
Part 5: Real-World Results: Phoenix SEO Audit Case Studies
Theory is great, but results are better. Here’s how this exact audit process has transformed real Phoenix businesses.
Case Study 1: Phoenix Law Firm
- The Problem: A beautiful website with zero organic traffic. They were completely invisible on Google and reliant on expensive PPC ads.
- The Audit Findings: Critical issues included a noindex tag left on from development, slow page speed (6.8s LCP), and severe keyword cannibalization.
- The Solution: We implemented our 15-step audit fixes, focusing on the technical foundation and content strategy.
- The Result:
– Organic Traffic: +850% in 12 months
– Keyword Rankings: From 12 to 89 page 1 keywords
– Monthly Leads: From 8 to 52 high-value cases
– Business Growth: Hired two new attorneys to handle the caseload.

Case Study 2: Mesa Home Services Company
- The Problem: Stagnant traffic and leads. They were losing ground to competitors in a crowded market.
- The Audit Findings: A poor mobile experience, inconsistent NAP across local directories, and a weak backlink profile.
- The Solution: We focused on local SEO optimization, mobile-first design improvements, and a targeted local link-building campaign.
- The Result:
– Local Map Pack Rankings: Top 3 for 15 high-value keywords
– Phone Call Leads: +2,300% increase
– Business Growth: Expanded from 2 to 8 service trucks.
—
Part 6: The Ultimate WordPress SEO Audit Checklist (Downloadable PDF)
We’ve compiled all 15 steps into a comprehensive, printable PDF checklist. Download it, print it out, and use it to guide you through your audit.
*(Note: This link is a placeholder. A downloadable PDF will be created from the checklist content below.)*
—
Part 7: Frequently Asked Questions (FAQ)
1. How long does a WordPress SEO audit take?
A basic audit can be done in a few hours. A comprehensive audit like the one outlined here can take anywhere from 10-20 hours, depending on the size and complexity of your site.
2. How much does a professional SEO audit cost?
Costs can vary widely. A professional audit from a reputable agency can range from $1,500 to $10,000 or more. Be wary of cheap audits, as they often miss critical issues.
3. Can I do an SEO audit myself?
Absolutely! This guide provides everything you need to perform a thorough DIY audit. It’s a great way to learn about SEO and take control of your site’s performance.
4. How often should I do an SEO audit?
We recommend a full, comprehensive audit annually, with smaller quarterly check-ups to monitor performance and stay ahead of algorithm changes.
5. What is the most common issue found in a WordPress SEO audit?
The most common issues are typically technical: slow page speed due to unoptimized images and bloated plugins, and indexing issues caused by incorrect `robots.txt` or `noindex` settings. We also frequently find severe keyword cannibalization where multiple pages compete for the same keyword, diluting their collective ranking power.
6. Will fixing these issues guarantee I’ll rank #1 on Google?
No SEO agency can guarantee a #1 ranking, and you should be wary of anyone who makes that promise. However, fixing the issues uncovered in a thorough audit will dramatically improve your chances of ranking well. SEO is a marathon, not a sprint. Consistent, strategic optimization over time is what leads to sustainable top rankings.

—
Part 8: The 90-Day Implementation Timeline
Now that you have your audit complete and your issues prioritized, you need a realistic timeline to implement the fixes. Here’s a proven 90-day roadmap that we use with our clients.
Month 1: Foundation & Quick Wins (Days 1-30)
Week 1-2: Technical Foundation
- Fix search engine visibility settings
- Implement HTTPS and canonical URLs
- Submit XML sitemap to Google Search Console
- Fix critical crawl errors
- Optimize Core Web Vitals (target: LCP under 2.5s)
Week 3-4: Quick Wins
- Fix all broken links (internal and external)
- Add missing alt text to all images
- Optimize image file sizes (target: under 100 KB each)
- Enable browser caching and lazy loading
- Clean up duplicate content
Expected Results: 10-15% improvement in site speed, elimination of critical errors, foundation set for long-term growth.
Month 2: Content & On-Page Optimization (Days 31-60)
Week 5-6: On-Page SEO
- Optimize all page titles and meta descriptions
- Fix heading hierarchy issues
- Improve URL structure for new content
- Implement internal linking strategy
- Add schema markup to key pages
Week 7-8: Content Enhancement
- Identify and update thin content pages
- Refresh top 10 highest-traffic pages with new content
- Create new content to fill keyword gaps
- Optimize for E-E-A-T signals
- Implement FAQ schema on relevant pages
Expected Results: 20-30% increase in organic impressions, improved click-through rates from search results, initial ranking improvements for target keywords.
Month 3: Authority Building & Monitoring (Days 61-90)
Week 9-10: Off-Page SEO
- Launch local link-building campaign
- Optimize Google Business Profile
- Ensure NAP consistency across directories
- Disavow toxic backlinks
- Reach out for guest posting opportunities
Week 11-12: Monitoring & Refinement
- Set up comprehensive tracking in GA4
- Monitor keyword rankings weekly
- Analyze user behavior with heatmaps
- Identify new opportunities from Search Console data
- Create next quarter’s action plan
Expected Results: 40-60% increase in organic traffic, 3-5 new page 1 rankings, measurable improvement in lead generation and conversions.
—
Your Turn: Take Control of Your SEO Destiny
You now have the knowledge, the tools, and the step-by-step plan to conduct an SEO audit that is more comprehensive than what 99% of your competitors are doing. You have a roadmap to fix what’s broken, optimize what’s working, and build a foundation for sustainable, long-term growth.
The silence from Google doesn’t have to be your reality. The frustration of a non-performing website can end today.
Take the first step. Start your audit. And if you get stuck or want a team of experts to handle it for you, Phoenix SEO Geek is here to help. We’ve conducted over 5000 WordPress SEO audits for Phoenix businesses, and we know exactly what it takes to transform a struggling website into a lead-generating machine. Contact us today at (480) 842-5055 for a free consultation, and let’s unlock your website’s true potential together. Your competitors are already optimizing. Don’t get left behind.
Travis Wilkie is the entrepreneurial force behind one of the most results-driven local search agencies in Arizona. With over a decade of front-line marketing experience and a proven track record of engineering dramatic lead-flow systems for service businesses, his mindset is simple: show up where your prospects are searching, talk to them in real-time, and turn clicks into calls into revenue.
Marketing isn’t about being loud—it’s about being present, persuasive, and persistent. Travis believes that by combining high-touch digital systems (chat, phone, reviews) with laser-focused geo-SEO and AI automation, the difference between “average” and “exceptional” becomes a choice you control.
If you’re a contractor, home-service provider or local business owner in the Phoenix region, partnering with Travis means you’ll:
-
Become highly visible in the coveted Google “3-Pack” map results for entire service territories—so you capture customers who search with intent.
-
Deploy AI chatbots and real-time interaction systems that greet website visitors, book service calls, and nurture leads without you having to chase them.
-
Generate more reviews, build a reputation machine, and turn your online presence into a revenue engine—not just a brochure site.
-
Move past “hopeful marketing” and into “predictable pipeline” mode: you’ll see the metrics that matter, understand the ROI, and scale what works.